A little
transit for your Monday?
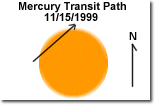
On Monday,
November 15th, 1999, the planet Mercury crossed in front of
the Sun, providing some entertainment for those with proper
filtering on their telescopes or binoculars.
What
happened?
The transit,
which is the term for an event in which one solar system body
crosses in front of another body from our perspective, went
off as predicted and was visible throughout Asia and North America.
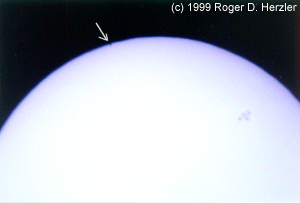
In this case, the planet Mercury traveled across the north-west
limb of the Sun, doing so for about and hour, and then exited
as noted in the diagram above (the diagram is pretty exaggerated
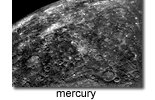
as well - Mercury never got that far into the Sun's disk as
you'll note in the images). It occurred in California around
1:11pm PST and lasted until roughly 2:10pm PST, although it
went out of view of my viewing apparatus long before that point.
I lost sight of Mercury around 2pm.
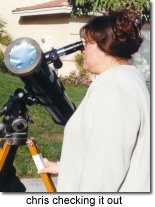
My adventure...
I went home
for a "late lunch" to view and photograph the event.
Armed with my 4.5" Newtonian telescope, Baader solar film
filter which I'd just gotten that week, and a Nikon FM2N camera,
I lined up to do battle with this phenomenon.
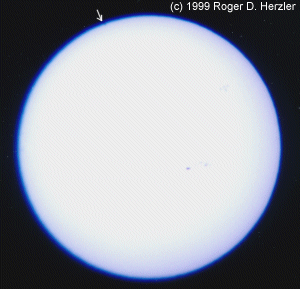
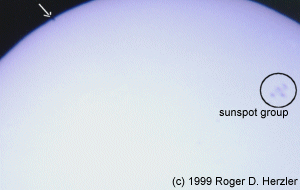
The observation
wasn't terribly exciting for everyone. After all, its just a
sun-spot looking thing on the limb, and there were a few real
sun-spots elsewhere that day. So one could easily have yawned
and moved on. In my case however, even my wife, who rarely gets
out to observe anything at night, came out to view and was sufficiently
impressed.
GEEK NOTES:
I tried to pay attention to the dynamics of this event, and
did note that there were a few ways to tell that this wasn't
an ordinary sun-spot, just as our ancestors (those with telescopes
and filters) probably did. First of all, Mercury moved across
the Sun very quickly when compared to the slow moving sun-spots,
who's apparent positions didn't seem to change in the time I
was watching (the equator of the Sun rotates once in a ~25.4
day period, although sun-spots can come and go in that time
period). Secondly, if I was paying attention and noting where
the spots were over time I'm sure that I would have noticed
some sun-spot movement and made note that they moved fairly
horizontally from our perspective, where Mercury sped across
at a different angle.
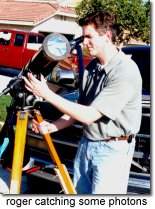
Any way,
those geek observations aside, it seemed to impress everyone
that stopped to take a look, even a couple of landscape workers
that happened by. One of the most interesting visitors of the
day came from a retired neighbor who mentioned that he'd never
looked through a telescope - ever. As someone that regularly
messes with telescopes, that was a foreign concept to me, but
he hadn't and was excited to do so. So the transit didn't disappoint.
Photographing
Techniques
I'd never
done much solar observing. I didn't have a filter until that
week, and had NEVER done any of my own solar photography. Please
keep that in mind when judging the validity of my statements
and techniques. The equipment: